Cahill Rooftop Observatory
User Guide: 14-Inch Celestron
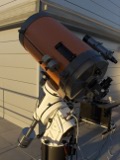
The 14-inch Celestron is our largest telescope, supporting all our eyepieces and CCDs. It's designed to be quickly polar-aligned, and contains a number of advanced features to correct for any remaining drift. Use of these features (Periodic Error Correction and Smart Guiding) lies outside the scope of this guide, as they are needed only for astrophotography projects.
A quick note on keypad versus computer control: most decisions, including the calculations required to move the telescope, are made by the control box built into the mount. The keypad may look like it's part of the telescope, but functionally it's just another computer: it relays messages from the mount, it lets you change mount settings, and it converts between object names and coordinates so you don't have to. It does almost nothing else. This means two things for observers:
- The telescope can be controlled simultaneously from the PC and from the keypad. The mount will obey the most recent instructions it's received from either source, with neither getting priority.
- The PC and the keypad don't communicate with each other directly. For example, if the PC tells the mount to change its slew rate to a particular value, the keypad will have no idea the rate has been updated and will continue to display the old value. However, a slew command from the keypad will use the slew speed set by the PC, since it was from the PC that the mount last received a slew speed command. The only information that's guaranteed to be accurate on either the keypad or the PC is the time and position, because both machines frequently ask the mount for updates.
Warnings
- Do not point this telescope at the Sun unless you have been trained and authorized with the solar filter – the telescope will focus the sunlight intensely enough to cause blindness and burns. Even observing by projection is unsafe.
- Always have the keypad's STOP button, or software equivalent, within reach while the telescope is slewing. Keep in mind that Starry Night tends to freeze during a Park command – you can't rely on a software stop then, but the keypad will still work.
- Don't move the telescope by hand. Moving manually invalidates the mount's coordinate solution, which will not only make it hard to find objects in the sky, but can make the mount attempt dangerous slews.
- Do not use the Star-Sync command unless the mount's slewing is badly out of whack and you know what you're doing, and never use it within an hour of the meridian. In normal use, use the less invasive Re-Calibrate.
- The flip mirror has a lot of thumbscrews – make sure you're turning the right one!
- Take care not to leave the telescope outside if it can get rained on.
- Take care not to bang the telescope into anything while moving it in or out.
- If you find that one of the eyepieces is dirty, please don't try to clean it yourself – it's very easy to inadvertently damage the coatings. Let us know and we'll take care of it.
Telescope Setup
Roll-Out
- If you will be using the computer to control the telescope, unplug the computer cart and roll it onto the deck. Getting the computer out of the way will make it easier to move the mount.
- If you won't be using the computer, unplug the black power supply box that's resting next to the monitor. You'll need to bring it with you.
- Take the plastic bag off the finderscope, and the cap off the main scope, and leave them inside. You may need to loosen the screws on the scope cap to get it to come off.
- Roll the telescope out onto the deck. Be careful to pull only on the mount, not on the motors or the telescope or anything attached to it, and be careful not to jar the telescope while pulling it over the threshold. You'll find it easiest to get the telescope out of the storeroom if you turn it so that the counterweight shaft is pointing due north, especially if you're leaving the cart behind.
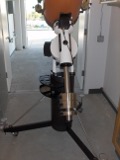
Roll out like this
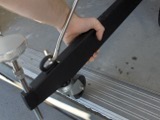
Lift over the threshold
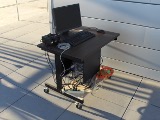
Park the cart here
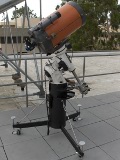
Park the scope here
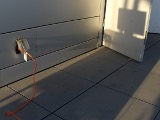
- Pull the telescope out onto the deck and turn it so that the counterweight shaft is pointing north. The three support screws should each be over one of the metal posts recessed into the deck.
- Tighten the support screws as far as they will go. Start with the southwest screw (the one whose plate has a small hole), followed by the east screw (the one whose plate has a long groove), followed by the northwest screw (the one with a plain plate). Tightening the screws in this order, and making sure they go all the way in, will make sure the telescope is close to polar alignment.
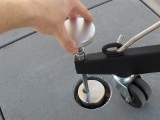
Start with this screw...
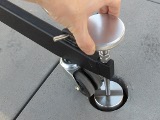
... then this one...
... and this one last.
Connections
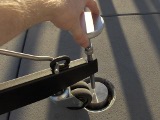
- Place the power supply on the ground next to the telescope. Plug the round cord into the socket on the south side of the mount marked "12V". If you've brought the computer cart with you, the power supply should already be plugged in. If you're not using the cart, get an extension cord from the storeroom cabinet.
- The outlet is over by the door.
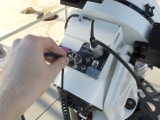
- If you're using the computer to control the telescope, plug the gray cable into the port on the south side of the mount marked "RS-232". The other end should already be in the computer.
- Remove whatever eyepieces and filters you wish to use for the observing run from the storeroom cabinet. Put them on the eyepiece tray on the northeast side of the mount.
Plug in the power supply

Plug in the control cable
Plug in the power

Handy eyepiece tray
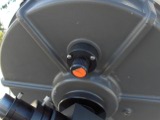
- Place one eyepiece in the top of the flip mirror, and tighten all three screws.
Starting up the Mount
- Turn on the power supply using the switch on its front face. After a few seconds, the mount keypad should display External Startup, indicating the mount is ready for startup commands.
- If you're using the computer to control the telescope, or both computer and keypad,
- Start up Starry Night Pro by clicking on the desktop or toolbar icon. It will take about a minute to load.
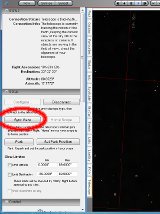
- Open the Telescope tab on the left side of the screen. Click Connect. When the pop-up window appears, select Unpark from Last-Park. This tells the computer that the mount hasn't been moved from its park position after being turned off.
- The keypad should now display its main menu (1=Objects, etc.).
- Starry Night will freeze for about 30 seconds while it exchanges data with the mount. When the Sync Gaze and Set Park Position buttons become active, Starry Night is ready to send slew commands.
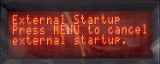
Mount ready
Telescope tab
Click Connect
- If instead you're using only the keypad,
- Press Menu to tell the keypad not to wait for a computer signal.
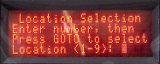
- The keypad will prompt for a location. Press 1, followed by GOTO.
- The next menu asks for a calibration strategy. Press 3 to "Resume from Park". This tells the keypad that the mount hasn't been moved from its park position after being turned off.
- The keypad should now display its main menu (1=Objects, etc.).
- The mount does not understand daylight savings time: the keypad keeps track, and tells the mount a modified time zone in the summer. Unless you know that you or somebody else has started up the telescope with the keypad only since the last time change, you should check:
- Press 2 to enter the Setup menu, followed by 1 to enter the Locations & Time menu, followed by 2 to reach the Date & Time screen.
- Check if the Daylight Saving flag at the bottom of the screen is set correctly. If not, use Prev to move to it and enter the correct value. Don't change the date or time. Press GOTO to confirm.
- Press Menu until the main menu reappears.
Location Menu
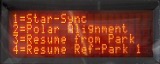
Calibration Menu
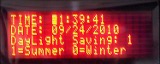
Check DST

Main Menu
- In principle, you're now ready to observe. In practice, the mount has only a rough idea of its location at this point, so you need to calibrate it before doing anything else. We have a list of good alignment stars on this website. Pick one that's a bit off the meridian, and re-calibrate on one using the keypad or Starry Night.
Telescope Use
Eyepiece Use
- To switch between eyepieces, loosen the three setscrews at the tip of the flip mirror, remove the old eyepiece, and put it safely in the eyepiece tray. Then put in the new eyepiece and tighten the screws. Turn the knob located on the back face of the telescope until the image comes into focus. The focus knob is quite sensitive, so you may overshoot if you turn it too quickly.
- The flip mirror acts as a diagonal, and should allow comfortable viewing at most angles. If you're observing an object low in the east or west, however, the eyepiece end of the flip mirror will point straight up or down. Don't try to turn the flip mirror if this happens; you won't be able to reattach it to the telescope. Instead, you can take a 1.25" diagonal from the storeroom cabinet and place it in the flip mirror, then place an eyepiece in the now-horizontal tube. Don't forget that there are now four screws to tighten – three on the flip mirror, and one on the diagonal itself.
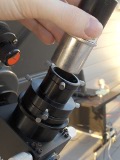
Inserting an eyepiece
Focus knob

Inserting a diagonal

Using a diagonal
- CRO stocks a variety of filters for image enhancement, including a SkyGlow light pollution filter that makes nebulae stand out more. To use a filter with an eyepiece, remove the eyepiece and screw the filter onto the base. Be careful not to over-tighten. Put the eyepiece back in the flip mirror or diagonal as normal.
- As of the time of writing, we have one 2" eyepiece for wide-field observing. To use this eyepiece,
- Convert the flip mirror into 2" mode by loosening the lowest screw on the eyepiece side and carefully removing the 1.25" adapter.
- Slide the eyepiece into the 2" hole and tighten the screw.
- When you're done, replace the 1.25" adapter. Make sure the screw is firmly holding it in place.

Inserting a filter

Loosen this screw

Two-inch eyepiece in place
Keypad Control
While observing you can switch freely between keypad and computer control. The keypad is more convenient for centering on objects and will give you faster slew speeds.
- The keypad will allow you to slew to any planet or bright star (i.e., one with a proper name or a Bayer (Greek) letter). It also has the complete Messier, NGC, and IC catalogs.
- Begin by pressing Menu until the screen gives the main menu (a list starting with 1=Objects). Pressing 1 on your keypad will give you a list of object types. The list is self-explanatory, with one important exception. Pressing 5 for "Stars" will only give you named stars. If you want to find δ Scorpii, for example, you will want to press 8 to enter the Tour menu.
- Select an object of interest:
- For the M, NGC, and IC menus, type in the catalog number you want, then press Next to get to the object screen first or GOTO to slew immediately.
- For the Sol, Strs, and Tour->Common Obj. Names menus, scroll through the list with the Prev and Next keys until your object appears. Press the number matching the object entry you want to get to the object screen.
- For the R/D menu, type in the coordinates, pressing Next and Prev to cycle between fields. Once you're done, press GOTO to slew.
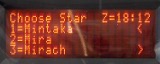
- For the Tour->Stars/Constell Menu, scroll through the constellation list with the Prev and Next keys (beware: the keys are much more sensitive on this screen). Once you have the right constellation, you can choose a star within it by scrolling with 6 and 0. The ordering is by English transliteration, so for instance gamma comes after eta.

Object Menu

Catalog Objects
Named Stars

Bayer Letters
- Once you're at the object screen (no matter how you got there), GOTO will slew to the object, Menu will cancel and back up, and Prev will cycle through basic information about the object. Next is for the very dangerous Sync command – don't use it!
- Once you press GOTO, the telescope will slew to the target with no further intervention. If you're crossing between the western and eastern halves of the sky, you'll see the telescope seem to slew "the wrong way", going near the north pole. This is normal for this type of mount. If you see the telescope swing below its counterweights, or do anything obviously dangerous, press STOP immediately. Always have the keypad ready, in case something goes wrong, until the mount finishes slewing.

Object Screen

Object Info
± Menu
- Once the telescope has stopped, the target will be in the field of view of the finderscope. Use the N, S, E and W buttons to center the object first in the finderscope and then in the eyepiece. These buttons do exactly the same thing no matter what screen you're on, so you don't need to use Menu to back up.
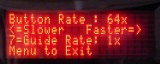
- If the movement is too fast or too slow, press ± to get the mount speed menu. Pushing Prev and Next on this screen will cycle through the button speeds. 64x and 12x are good starting speeds for the finderscope and eyepiece, respectively. Since the N-S-E-W buttons work on this screen as on all others, with a bit of practice you can rapidly change speeds while moving.
- The finderscope field of view is very large – almost 5 degrees across. If you are centering in the finderscope, you need to get the target hidden behind the crosshairs if you want to see it in the eyepiece. A common mistake is to first center the target completely in RA or completely in Dec. This hides the target behind one of the crosshairs, making it impossible to tell how far it is from the other. Stay a tiny bit off the crosshairs until you're almost done.
- The farther you're slewing across the sky, the bigger you can expect your pointing errors. If you're just starting an observing run, or if you're moving to a new part of the sky, you can get much better performance by re-calibrating the mount's coordinate system.
- Pick a bright star from our list, or one that's conveniently near your target(s). Try to avoid stars that are right on the meridian, as they can confuse the telescope. Make sure you can recognize the calibration star in the finderscope and eyepiece, e.g. it's much brighter than its neighbors. Don't use planets, because their coordinates might not be accurate, or extended objects, because you can't center them as precisely.
- GOTO it and center it in the eyepiece as best you can. (Yes, you must specifically use GOTO for this to work.)
- Press RA/DEC Rev from anywhere other than the ± menu. If you're in the ± menu, press Menu to back up one level first.
- Press 9 to tell the telescope that it's now pointed at the last object you told it to go to. The keypad should beep in confirmation. Press Menu to exit.
- You'll now get much better slewing performance in the area of your calibration target.
- By default, the mount uses Sidereal tracking, i.e. it tracks the sky at (approximately) the same rate as the stars. The Sun and Moon, however, move across the sky slightly slower than the sidereal rate. This difference can build up noticeably over half an hour. You can switch to Solar or Lunar tracking by going to the main menu (hit Menu until you've backed out of all menus), and pressing 8 until the desired tracking mode is shown. The tracking rate gets stored from session to session, so be sure to set it back to Sidereal when you're done.
Computer Control
While observing you can switch freely between keypad and computer control. Starry Night Pro is more convenient for finding and slewing to objects, and for giving you an idea of what to expect in your field of view. It also has a much larger database of objects.
- Starry Night can slew to any object in its database, which is, for all practical purposes, any object that is visible from Los Angeles.
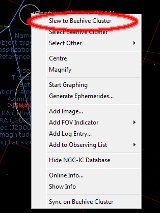
- Right click on the target, then choose Slew to [Name] from the pop-up menu. Do not click Go There – that changes your location, probably not what you wanted.
- The telescope will slew to the target with no further intervention. If you're crossing between the western and eastern halves of the sky, you'll see the telescope seem to slew "the wrong way", going near the north pole. This is normal for this type of mount. If you see the telescope swing below its counterweights, or do anything obviously dangerous, click the button with a stop sign immediately. Always be ready to stop the mount in case something goes wrong, until the telescope has finished slewing.
- Once the telescope has stopped, the target will be in the field of view of the finderscope. Use the keypad to center the object. Trying to center from Starry Night is possible but pretty slow and impractical.
Right-click to slew

STOP
Sync Gaze
- The farther you're slewing across the sky, the bigger you can expect your pointing errors. If you're just starting an observing run, or if you're moving to a new part of the sky, you can get much better performance by re-calibrating the mount's coordinate system.
- Pick a bright star from our list, or one that's conveniently near your target(s). Try to avoid stars that are right on the meridian, as they can confuse the telescope. Make sure you can recognize the calibration star in the finderscope and eyepiece, e.g. it's much brighter than its neighbors or forms a distinct pattern. Don't use planets, because their coordinates might not be accurate, or extended objects, because you can't center them as precisely.
- Slew to and center it as normal.
- Right click on the target, then choose either Center or Magnify. You can press space to skip Starry Night's animation and center instantly.
- On the Telescope tab, click Sync Gaze. This tells the mount it is really pointed at the center of Starry Night's screen.
- You'll now get much better slewing performance in the area of your calibration target.
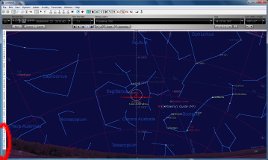
- If you open the FOV tab, you can overlay fields of view for your finderscope and eyepieces on the main Starry Night screen. This is handy for getting your bearings if you're looking for a nonobvious target, or even for just appreciating how large the finderscope field is.
- You can right click on any object and choose Show Info to open a tab listing the object's coordinates. The tab will often include other information, such as its apparent size or its distance. You can get an abridged version of this display by hovering your mouse over the object.

FOV Tab

Finder and Eyepiece

Info tab

Find tab
- If you don't know where an object is, you can search for it by opening the Find tab. Type in a name of the object you're looking for. Right clicking on an entry in the list will give you all the options you get by right clicking on the object itself, including Slew To, Center, and Show Info.
Telescope Shutdown
- Park the telescope:
- If you are using the keypad, go to the main menu, then press 2 to enter the Setup Menu, followed by 4 for the Park Menu. Press 3 to tell the telescope to slew to its storage position and shut down.
- A less recommended way is to click the Park button on Starry Night's Telescope tab. It makes no difference to the mount where the command comes from, but Starry Night will freeze for about 30 seconds after you click Park. If you Park from Starry Night, only the keypad will be able to stop the telescope if something goes wrong.
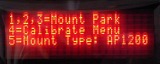
Parking from the keypad (pick 3)
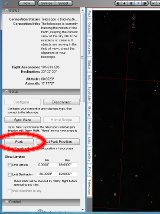
Parking from Starry Night
Wait
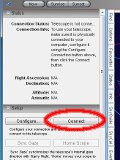
- If you're using Starry Night, click Disconnect once the telescope is parked. Exit and shut down the computer.
- Turn off the mount's power supply. Unplug the power supply and the gray computer cable from the telescope. Store both power supply and cable on top of the cart.
- Remove the eyepiece from the flip mirror, and return all eyepieces and similar equipment to the storeroom cabinet.
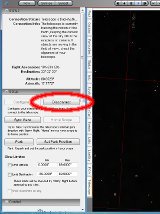
Close the connection
Unplug the telescope
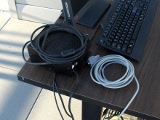
Store the cables

Storage Position
- Lift the screws that hold the telescope to the deck. Make sure they're high enough to clear the door threshold.
- Pull the telescope inside and put it against the wall, between the C-10 and the power box. Be sure the telescope doesn't actually touch the wall. Again, it will be easiest to maneuver the telescope if the counterweight shaft is facing north.
- Bring the computer cart inside, if you were using it, and park it in the corner by the door. You don't need to plug it back in.
- Recap the main scope and finderscope.