Cahill Rooftop Observatory
User Guide: 8-Inch Celestron
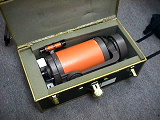
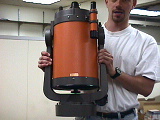
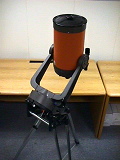
The 8-inch Celestron is our largest portable telescope, providing an excellent mix of power and portability. It can fit in the trunk or back seat of a car for viewing from dark-sky sites. The 8-inch Celestron includes 40 mm and 25 mm eyepieces and a diagonal.
Warnings
- Do not point this telescope at the Sun unless you have been trained and authorized with the solar filter – the telescope will focus the sunlight intensely enough to cause blindness and burns. Even observing by projection is unsafe.
- Take care not to leave the telescope or case in a location where it can get rained on.
- The finderscope is very delicate; take care not to shove it into the side of the telescope case or to apply pressure on it while moving the telescope.
- Disengage the RA or dec brake before moving the telescope by hand.
- The telescope will tip over in dec if the brake is not engaged. Never leave the dec brake off when the telescope is not actually being moved, and never let go of the telescope if the brake is off.
- Although the dec fine adjust knob can (and should) be turned with the dec brake on, this is not the case for the RA fine adjust knob – loosen the brake before moving in RA.
- If you find that one of the eyepieces is dirty, please don't try to clean it yourself – it's very easy to inadvertently damage the coatings. Let us know and we'll take care of it.
Telescope Setup
Tripod and Wedge Setup
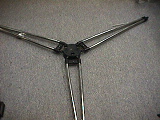
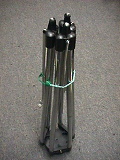
- Place the tripod on the ground with the legs pointing up.
- Remove the bungee cord and gently lie the legs flat on the ground. Do not just let them fall. The bungee cord is easy to misplace, so put it inside the telescope case (or somewhere else where you're absolutely guaranteed to find it).
- Lift the center pedestal so that the legs swing underneath. You may need to move the leg spars so they all face the center. The tripod should be able to stand on its own at this point.
Step 2
Step 3
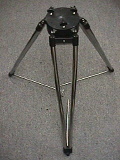
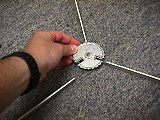
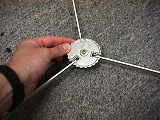
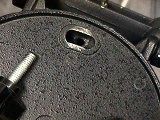
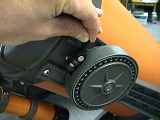
- Pull the legs spars together at the center. Rotate the central hub cover counterclockwise to uncover the locking slots.
- Hook the two loose spars into the central hub. Release the cover, letting it rotate back into place.
Step 4
Step 5
- Place the wedge atop the pedestal and align the slots with the threaded holes on the
pedestal. Be careful, as only three of the six holes in the pedestal (those next to each leg) are threaded. In the telescope case are three screws marked "Tripod". Put a screw through each slot, and then tighten all three.
Step 6
Step 7
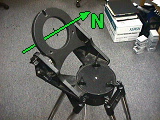
- Move the tripod to a flat, stable location before mounting the telescope, and rotate the entire assembly so that the inclined wedge surface is pointing roughly north. If you're at a paved location, a good trick is to line up the horizontal metal bar under the wedge with something running east-west. Do not polar-align the tripod using its legs; because you have some leeway in aligning the wedge with the tripod, the legs won't point in any special direction when the mount is correctly aligned.
Mounting the Telescope
- Open the telescope case, if you haven't already. Note which way the telescope is pointed (base end towards the thinner foam) and rotated (with the piggyback finderscope nestled against the rear foam panel).
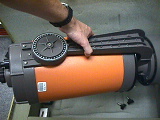
- Lift the scope by the gray fork arm, and then carry it by gripping the fork on each
side of the tube. Be careful that the finderscope doesn't get pushed into the side of the case. Try not to hold up the telescope by the tube.
Step 1
Step 2
Step 2
- On the top edge of the wedge mount is a slot. On the bottom of the telescope base is a single screw. Slide the screw into the slot so that the bottom surface of the base is flush with the inclined surface of the wedge. You may need to loosen the screw.
- The telescope should rest stably in this position, but you should continue to support the telescope so it doesn't put too much torque on the screw. Do not tighten the screw just yet.
Step 3
Step 5
- Find the two screws marked "Scope" in the trunk. They go in the two holes on the back of the wedge surface. Some wiggling of the telescope base may be necessary to get the screw holes aligned. Do not tighten any of the screws until the others have been placed, then tighten all of them snugly. Once all three screws are tightened you can stop supporting the telescope. There will still be a slight gap between the wedge and scope base.
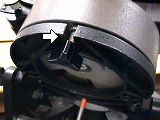
- The scope is now mounted. If the finderscope is on the bottom side of the tube you will want to rotate it to the top side. Release the RA brake (a paddle on the top side of the telescope base) by flipping it so it is pointing away from the telescope tube, then turn the telescope in RA until the finderscope is on top. Lock the RA by turning the paddle so that it faces left.
- Release the dec brake (a paddle on the end of one of the fork arms), and rotate the telescope so it is pointing upward. You want the back end of the telescope to be easily accessible. Lock the dec brake before letting go of the telescope tube.
RA Brake
Dec Brake
Step 7
Step 8
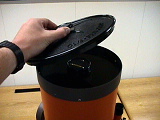
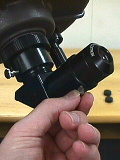
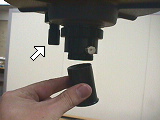
- Pull the front aperture cap off the telescope and put it in the telescope case.
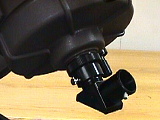
- In the white cardboard box in the trunk is a 1.25-inch diagonal, a 90 degree reflector system. Remove the diagonal from its box and insert the shiny tube fully into the eyepiece socket on the telescope. Tighten the setscrew snugly.
- Remove a wide-field eyepiece (25 mm or longer) from its box and take off any dust caps. Insert it into the socket on the diagonal, and tighten the setscrew snugly.
Step 8
Step 9
Step 10
You're now ready to observe!
Telescope Use
- To move the telescope a large amount in RA, release the RA brake, then move the telescope tube by hand. Do not slew by pulling on the finderscope or the eyepiece – the finderscope in particular has a very delicate mount.
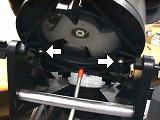
- To move slightly in RA, release the RA brake, then turn the RA fine adjust knob on the base.
- To move the telescope a large amount in declination, release the declination brake, then move the telescope tube by hand. Do not slew by pulling on the finderscope or the eyepiece – the finderscope in particular has a very delicate mount. Always secure the dec brake before letting go of the telescope, even if it's just for a moment.
- To move slightly in dec, make sure the dec brake is locked, then turn the dec fine adjust knob at the base of the fork. This knob has a limited range of motion, so try not to use it for really huge moves.
RA Brake
RA Fine Adjust
Dec Brake
DEC Fine Adjust
- Use the finderscope to center the target object or a nearby reference star on the crosshairs. Once the target is centered in the finderscope it should be visible in a wide-field eyepiece. You can then center the target or move to a nearby object using the fine adjust controls. You should move in only RA or only dec at a time. This will give you more control and make it harder to get lost, since you can always sweep back along the direction you were last moving.
- If the object drifts out of the field of view, use the RA fine adjust knob to slew until you find it. If the mount is well-aligned, you should be able to track objects using only RA adjustments.
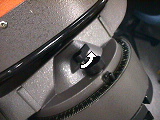
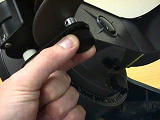
- To rotate the eyepiece assembly to the most comfortable position, loosen the setscrew you tightened in step 9 above, rotate the diagonal, and retighten the screw.
- To switch between eyepieces, loosen the setscrew on the diagonal, remove the old eyepiece, and put it safely back in its box. Then put in the new eyepiece and tighten the screw. Turn the knob located on the back face of the telescope until the image comes into focus. The focus knob is quite sensitive, so you may overshoot if you turn it too quickly.
Inserting an eyepiece
Focus knob
Telescope Shutdown
- Recap the main aperture.
- Remove the eyepiece from the diagonal, if any, put both dust caps on, and return it to its box. Take the diagonal, if any, from the eyepiece socket on the telescope, and put it back in its box. Put all boxes against the thicker (eyepiece) side of the telescope case, so they do not get in the way when you put away the tube.
- Rotate the scope in dec to the storage position (aperture pointing towards the base) and lock the dec brake.
- Rotate the scope in RA to the storage position (finderscope on top, both fork arms at the same height) and lock the RA brake.
- While supporting the weight of the tube, remove the two lower screws that hold the telescope base to the wedge.
- Loosen (but do not remove) the top screw in the slot. A single turn should be sufficient.
- Holding the telescope by the fork arms, lift it from the slot, and place it in the trunk,
with the base end toward the thinner side of the foam and the finderscope on the top rear. If in doubt, look for the impression of the finderscope in the foam of the top lid. Lift on the front fork arm to rotate the scope so that the finderscope is snug against the rear foam, or else the lid may scrunch it.

Step 4
Step 5
Step 6
Step 7
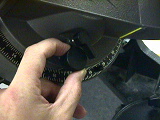
- Unscrew the wedge from the tripod pedestal. Put all five screws (three from the wedge, two from the telescope) in the telescope case.
- Unlock the spars from the hub, and fold the tripod legs back around to
the storage position. Secure them with the bungee cord. Hook the ends of the cord onto each other, not onto any part of the tripod. Otherwise, the strain will deform the spars.
Tripod like this
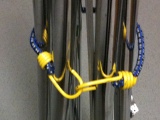
Cords like this