Cahill Rooftop Observatory
User Guide: Questar
The 3.5-inch Questar is a mid-range telescope, easier to carry than the 8-inch but more effective than the Galileoscopes. The Questar comes with a Questar brand eyepiece and a Celestron reticle eyepiece, both of which provide roughly the same magnification (50×, not the 40× claimed on the Questar eyepiece barrel). The Questar eyepiece has a wider field of view and is needed for the finderscope, while the reticle eyepiece has better optics.
The telescope is quite short, and you may wish to provide a table for mounting it.
Warnings
- Do not point this telescope at the Sun unless you have been trained and authorized with the solar filter – the telescope will focus the sunlight intensely enough to cause blindness and burns. Even observing by projection is unsafe.
- Don't take the scope's small size as a license to fling it about wildly. Make sure it's well protected in the trunk or your car, or rides on the rear floor in the cabin, so it won't tumble off the seat if you stop suddenly.
- Take care not to leave the telescope or case in a location where it can get rained on.
- Make sure the declination brake is off before trying to move in dec.
- If you find that one of the eyepieces is dirty, please don't try to clean it yourself – it's very easy to inadvertently damage the coatings. Let us know and we'll take care of it.
Telescope Setup
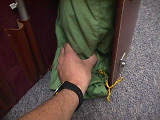
- Open the case by pushing both latches away from each other.
- Remove the telescope from the case.
- Loosen the declination brake by turning it clockwise.
- Tip the tube over by pushing on it, so that you can see the Cassegrain knobs.
- Unscrew the cap from the front of the telescope.
Step 2
Step 3
Step 4
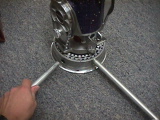
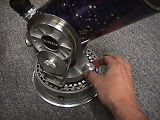
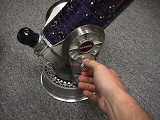
- Remove the two identical side legs from their pocket in the case lid and insert them in the holes in the side of the telescope base. They go in on a radial vector. Make sure they go in fully – about 2 inches.
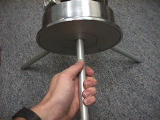
- Tip the scope up on the two legs, and insert the third (telescoping) leg into the socket on the bottom of the base.
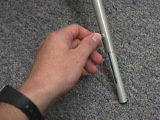
- Adjust the length of the telescoping leg until the first pencil mark lines up with the edge of the outer tube, and then rotate the entire assembly to point north. Further adjustments to polar alignment can be made by sighting on Polaris.
- The telescope has a built-in drive that you can use to track objects if it's been polar-aligned. Simply plug the black cable into the socket on the bottom of the telescope base. Once plugged in, the drive runs automatically.
Step 1
Step 2
Step 3
Observing
- To move the telescope in RA or azimuth, move the telescope fork by hand, or turn the RA knob for fine adjustment.
- To move the telescope in declination or altitude, first check that the declination brake knob is loose, and then tilt the barrel by hand or turn the Dec adjust knob for fine motion.
RA Fine Adjust
Dec Fine Adjust
Dec Brake
- Use the finderscope mode (see below) to center the target object or a nearby reference star on the crosshairs. Once the target is centered in the finderscope it should be visible when you switch back to normal mode. You can then center the target or move to a nearby object using the fine adjust controls. You should move in only RA or only dec at a time. This will give you more control and make it harder to get lost, since you can always sweep back along the direction you were last moving.
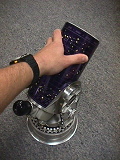
- To switch between the two eyepieces, unscrew one from the telescope and screw the other into the same barrel. Do not try to pull out the eyepiece as you would with most telescopes. You will need to refocus the telescope (see below) after putting in the new eyepiece.
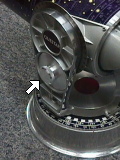
The Questar has a number of different lenses and mirrors built in, for different observing modes. The modes are controlled by a combination of knobs on the back of the telescope.
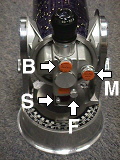
- F (focus)
- Turn this knob to focus the telescope.
- M (mode)
- This knob selects whether the main scope or the finderscope mirror is routed to the eyepiece. Turn clockwise for the finderscope view. (If the field is dark, check the solar filter, described below.) Turn counterclockwise to use the telescope. The finderscope cannot be focused with the telescope's focus knob – instead, twist the top of the Questar eyepiece to focus. The finderscope cannot be focused at all with the reticle eyepiece in place.
- B (Barlow lens)
- Turning this knob clockwise inserts a Barlow 2× magnifier into the beam path.
- S (solar filter)
- Turning this knob counterclockwise puts a solar filter in front of the finderscope mirror. Note that solar observations with the finderscope not recommended; we have a separate page on the preferred procedure. Turn the knob clockwise to flip the filter out of the beam path for normal operations.
Shutdown
- Unplug the power cable if you were using the tracking motor and put it back in its bag.
- Remove the tripod legs, if they were installed, and return them to their pockets in the case.
- Return the barrel to zenith pointing (you may want to use the declination setting circle), and screw the cap back on. Be careful not to let the cap slip and scratch the lens; it's harder than it looks.
- Slide the telescope back into the case. Close and latch the case.