Latest update Jan. 18, 2009, Jeff Hickey
The Main Camera Gui: Basic Operation
The following is a introduction in how to run the Arcview camera gui. For a more detailed training session, contact Jeff or Kevin on the mountain to set up a hands on run through.
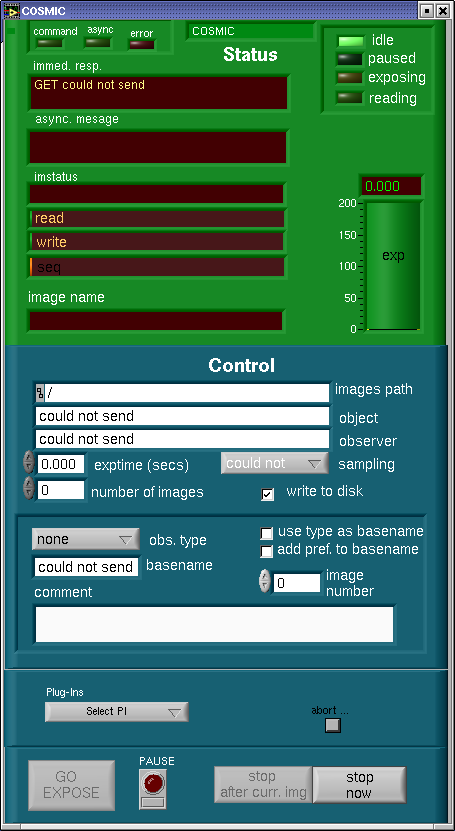
The camera gui is the Palomar ArcVIEW standard camera gui that is in use on DBSP, TSPEC, Echelle, Wirc, CCD15, and FLI. The top of the gui in light green is camera status. The lower part of the gui in dark green is camera control. The status part is pretty much self evident. In this version of the user's manual we will concentrate on the camera control and leave the status side to a later update.
At the top of the control section is ths images path. This path is set at startup to /rdata/COSMIC/"the UT date" (eg.20090118). Do not try to change this path. To get to your data from the workstation computer, ssh as user to the computer that is running the camera. Ask instrument support for passwords etc..
The next two boxes are "object" and "observer" information that goes into the fits image headers.
The exposure time can be entered by keyboard after mouse clicking in the exptime box. The same is true of the number of (successive) images box. The arrow keys next to each box can also be used to increment the values by one. The "sampling" box is a leftover from the TSPEC gui and when I get the time I will delete it. The final item in this area is the "write to disk" selection. It is probably a good idea to leave this selected because at the moment we do not have realtime display of the image.
The next section down has a pulldown menu "obs. type" which selects the type which goes into the fits header. The only selection which actually does anything is "dark" which leaves the shutter closed. Below that is the "basename" box which selects the fits file prefix (eg.enter "cos" first file name is cos0001.fits). "Use type as basename" s buggy, don't use it. Soon it will go away.
The image number is the next image number that will be used. It increments automatically. It can be clicked on to edit. The gui will never delete data if the image file name is duplicated. The gui adds a -0 to any files that have identical numbers.
The next box is for comments. IMPORTANT NOTE: NEVER USE COMMAS NOR SEMI-COLONS. THE GUI INTERPRETS THESE AS "WAIT FOR NEXT COMMAND", IT WILL HANG THE GUI.
The next section has a pull down menu for module "Plug-Ins". The pulldown menu is a standard menu used in other guis. For COSMIC only one Plug-In is useful. Use this menu to get the ROI (region of interest) gui. This gui is described below. The small button to the right of the pulldown is called "abort". Click this button and two hidden buttons appear, "QUIT" and "ABORT". "QUIT" cleanly shut down the gui. Use this button if the gui hangs. My advise is to never use the abort button to stop an exposure. It can hang the system. Use the "stop" button below to cleanly stop an exposure.
At the bottom of the gui are the expose and stop buttons. Obviously "Go Expose" starts an exposure. The "pause" button closes the shutter and lets the observer change the exposure time. Click pause a second time and the exposure resumes. "Stop after curr. img." stops a sequence of exposures after the current exposure is done. "Stop now" cleanly stops and reads out an image. This is a much better choice for aborting an exposure.
IMPORTANT NOTE; STARTING THE COSMIC ICON ON THE WORKSTATION COMPUTER STARTS A VNC SESSION ON THE COMPUTER THAT CONTROLS THE CAMERA. IT IS SUPPOSED TO START A "SHARING" PROGRAM THAT ENABLE SERIAL COMMUNICATIONS FOR SEVERAL GUIS. IF STARTING THE WHEELS OR CALCULATOR GUIS FAILS, QUIT THE CAMERA GUI AND RESTART USING THE ICON IN THE COSMIC FOLDER ON THE VNC CAMERA COMPUTER ENVIRONMENT. CONTACT INSTRMENT SUPPORT AND MAKE SURE THEY SHOW YOU HOW DO DO THIS.
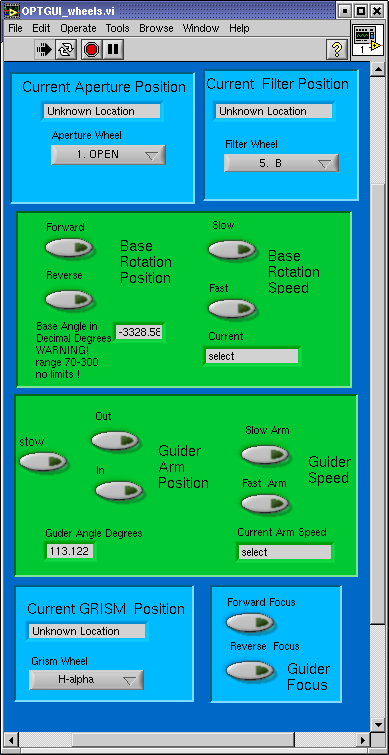
The Wheels GUI; the basics.
After the COSMIC icon on the workstation computer brings up the VNC window and the camera gui on the camera computer, find a folder on the VNC desktop labeled "COSMIC". Open this folder click on the "wheels_gui" icon. This brings up the cosmic wheel control gui. This gui is fairly simple, pulldown menus select wheel locations and buttons control speeds and encoder devices that move in an "analog fashion.
Starting at the top of the gui, in light blue are the Aperture and Filter wheel controls. The Aperture wheel is controlled with a pulldown menu. Simply pulldown the menu and select the position desired. The aperture wheel menu may be edited to enter your names for the aperture masked used in observing. Ask instrument support how to do this. If COSMIC is in direct mode the aperture wheel will not be connected and the window will indicate "Unknown Location". The Filter Wheel operates just like the Aperture wheel using a pulldown menu.
IMPORTANT NOTE; DO NOT USE THE GRISM OR APERTURE WHEELS IN DIRECT MODE, YOU WILL HANG THE GUI.
The next frame is the Base Rotation window. First select rotation speed (fast or slow). Next to rotate the COSMIC base simply hold down the forward or reverse button. The angle will update in the Base angle window.
The next frame down is the Guider control window. First like the Base Rotation one selects the Guider Arm Speed (fast or slow). Then click and hold the Out button to move the guider arm out of the stow position. Keep holding the out button down until a suitable guide star shows in the guider camera window. Once a star is found, focus the star with the Guider Focus control buttons in the light blue frame just below the Guider arm control frame. When guiding is done and you want to slew to a new location, press the "stow" button to send the guider arm back to the safe (overexposure safe) location.
The final frame at the bottom of the gui is the Grism Wheel control. This is just like the Aperture and Filter Wheel controls. Use the pulldown menu to select desired location.
IMPORTANT NOTE; THE GUI COMES UP WITH PULLDOWN LOCATION THAT ARE DEFAULT PROGRAMMING LOCATIONS THAT PROBABLY HAVE NOTHING TO DO WITH THE ACTUAL WHEEL LOCATION. AT START UP IN REIMAGING MODE, SEND THE APERTURE, FILTER, AND GRIM WHEELS TO SOME LOCATION TO SYNC UP THE MENU AND LOCATION INDICATORS. IN DIRECT MODE ONLY DO THIS TO THE FILTER WHEEEL.
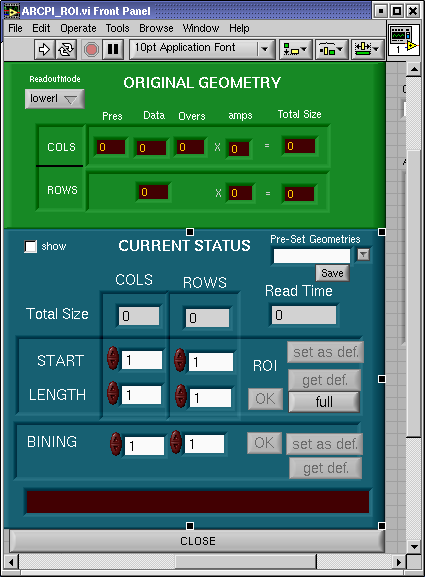
The Region of Interest GUI; The Basics
As mentioned above the ROI gui is brought up in the Main camera gui with the pulldown Plug-in menu. As with the camera gui the top half is status (or setup) and the lower half is control. This gui is used to subraster or bin cosmic images. Note that the subrastering is set by starting pixel and length of sub-region. To make changes type in numbers in a window, hit return, press "ok", and press "set as def" to save your changes. The binning selections are done the same way. Notice that the "Read Time" value changes with subraster or binning changes.
As always, if these instructions are too vague or unclear, contact Instrument Support for.....support.

The Guider Head Calculator; Really Basic
The GHEAD gui is brought up with the GHEAD icon in the COSMIC folder just like the Wheels gui. Click the icon.
The GHEAD calculator is needed to tell the telescope where the guider arm and base angle are. These values are combined to orient the guider move. The values are updated by pressing the right arrow button at the top of the gui. At that point tell the telescope operator the ghead value. At this point the operator needs to enter that value manually. Soon I will automate this. Promise.
The telescope operator will operate the Shepard Autoguider once you've selected a star with the guider controls and given the GHEAD value to the operator. If you've used COSMIC or DBSP before and feel confident, the telescope operator can show you how to use the Shepard Autoguider