Cahill Rooftop Observatory
User Guide: 10-Inch Celestron
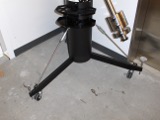
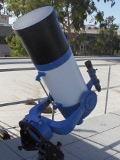
The 10-inch once stood atop the Downs roof. Remounted through the heroic efforts of Mike Roy, it's now available to rooftop observers who don't want the hassle of getting out the more elaborate 14-inch. The 10-inch can be used with any 1.25" eyepiece, filter, or Barlow lens. If you want to do astrophotography or wide-field observing, you should use the 8-inch or 14-inch instead.
Warnings
- Do not under any circumstances whatsoever point this telescope at the Sun – the telescope will focus the sunlight intensely enough to cause blindness and burns. Even observing by projection is unsafe.
- Disengage the RA or dec brake before moving the telescope by hand, unless you're using the fine adjust knobs.
- Do not use the eyepiece, diagonal, or finderscope as handles when moving the telescope.
- Take care not to leave the telescope outside if it can get rained on.
- Beware the threshold at the door to the rooftop – you will snag the telescope on it if you're not careful.
- If you find that one of the eyepieces is dirty, please don't try to clean it yourself – it's very easy to inadvertently damage the coatings. Let us know and we'll take care of it.
Telescope Setup
Roll-Out
- First, roll the C-14 out into the lobby to make room for the C-10. See the C-14 manual for details.
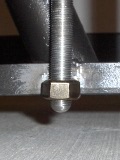
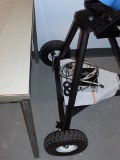
- Loosen the three support screws until they are almost completely up (at most a quarter of an inch showing below the buggy). Any lower, and they'll bang into the threshold when you roll the telescope outside. The front screw is particularly prone to snags, since it's far from any of the wheels.
Get the C-14 clear
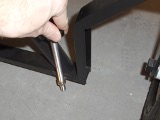
Loosen screws...
... to this high
- Pull the telescope out onto the deck and turn it so that it's facing south. Make sure none of the three support screws are located over a crack in the tiles.
- Tighten the support screws until all three wheels can turn freely. The screws can be hard to turn, as each is carrying a third of the telescope's weight. Pushing up on the leg of the mount will take some of the weight off the screw and make things easier.
Setting Up the Tube
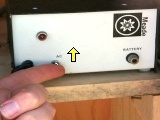
- Take the power supply out from under the telescope. Take the white cord with the black plug and plug it into the blue housing on the south side. The two prongs on the plug are different sizes – make sure you get the right polarity or it won't go in. Plug the gray cord into the outlet by the door (you will probably need an extension cord).
- Flip the switch on the power supply to the top position. You should see a light on both the power supply and the mount.
- Uncap the main scope, the finderscope, and eyepiece hole and put the caps where you won't trip over them.
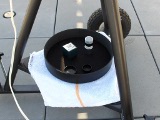
- Remove a diagonal and whatever eyepieces and filters you wish to use for the observing run from the storeroom cabinet. Again, put them somewhere where you won't trip over them. The tray beneath the telescope makes an excellent spot.
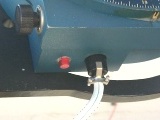
Black plug and light
Power up
Handy storage area
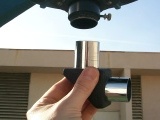
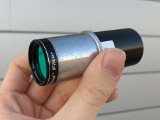
Insert Diagonal
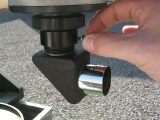
Tighten Screw
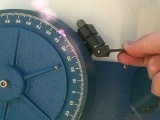
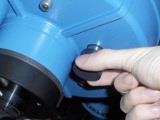
- Slide the diagonal into the telescope back and tighten the long set screw.
- You're now ready to observe!
Telescope Use
- To move the telescope a large amount in RA, release the RA brake, then move the telescope tube by hand. Do not slew by pulling on the finderscope or the eyepiece.
- To move slightly in RA, turn the RA fine adjust knob on the base. Make sure the RA brake is locked before you use the RA adjust.
- To move the telescope a large amount in declination, release the declination brake, then move the telescope tube by hand. Do not slew by pulling on the finderscope or the eyepiece.
- To move slightly in dec, turn the dec fine adjust knob at the base of the fork. This knob has a limited range of motion, so try not to use it for really huge moves. Make sure the dec brake is locked before you use the dec adjust.
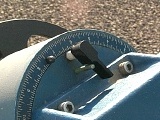
RA Brake

RA Fine Adjust
Dec Brake
DEC Fine Adjust
- Use the finderscope to center the target object or a nearby reference star on the crosshairs. Once the target is centered in the finderscope it should be visible in a wide-field eyepiece. You can then center the target or move to a nearby object using the fine adjust controls. You should move in only RA or only dec at a time. This will give you more control and make it harder to get lost, since you can always sweep back along the direction you were last moving.
- The RA locking mechanism connects to the clock drive, so it should be locked for sidereal tracking to work; otherwise, the scope will just sit there while the motor spins along. Always be sure to lock the telescope after you've finished moving.
- To rotate the eyepiece assembly to the most comfortable position, loosen the long setscrew at the back of the telescope, rotate the diagonal, and retighten the screw.
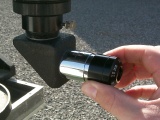
- To switch between eyepieces, loosen the setscrew on the diagonal, remove the old eyepiece, and put it safely back in its box. Then put in the new eyepiece and tighten the screw. Turn the knob located on the back face of the telescope until the image comes into focus. The focus knob is quite sensitive, so you may overshoot if you turn it too quickly.
- CRO stocks a variety of filters for image enhancement, including a SkyGlow light pollution filter that makes nebulae stand out more. To use a filter with an eyepiece, remove the eyepiece and screw the filter onto the base. Be careful not to over-tighten. Put the eyepiece back in the diagonal.
Inserting an eyepiece
Focus knob
Inserting a filter
Telescope Shutdown
- Remove the eyepiece from the diagonal, put any dust caps on, and return it to its box. Take the diagonal out and put it back in its box. Put all eyepieces and diagonals back in the cabinet in the storeroom.
- Unplug the telescope power supply from both the wall outlet and the mount. Coil the cables neatly and put the power supply and cables on the tray underneath the mount.
- Recap the main aperture, finderscope aperture, and eyepiece hole.
- Rotate the scope in RA to the storage position (finderscope on top, both fork arms at the same height) and lock the RA brake.
- Rotate the scope in dec to the storage position (pointing up, perpendicular to the fork arms) and lock the dec brake.
Storage position
Parking spot
- Loosen the three support screws. Remember that they need to be high enough to clear the entrance.
- Roll the telescope back into the storeroom, and turn it around so that it is facing the doorway. Park the telescope next to the table, as close to the wall as you can get without brushing against it.
- Tighten the support screws, holding up the mount if neccessary, until all three wheels can rotate freely. This helps keep the tires from deforming under the telescope's weight.
- Move the C-14 back into place. Check the C-14 manual, as it's much easier to get the telescope out than to get it back in!