Cahill Rooftop Observatory
User Guide: SBIG ST-9E
The ST-9E is our main imaging CCD, with a default field of view of 12′. It can take exposures of up to 5-6 minutes before the sky begins to saturate. A built-in guider allows for improved tracking for some exposures.
This manual covers use of the ST-9E with the 14-inch Celestron on the Cahill rooftop. We require that users be familiar with the C-14 before getting authorized to use the CCD. Observers who are authorized on the ST-9E, the C-14, and the C-8 may use the ST-9E with the latter at their discretion. Bear in mind that the C-8 does not track, limiting the astrophotography projects for which it is suited.
Warnings
- Do not mount or remove the CCD out on the deck. Do so in the telescope storeroom, with all parts and tools in easy reach.
- Make sure the CCD is securely attached to the telescope. The attachments need to hold a lot of weight as the telescope slews around.
- Make sure none of the CCD cables snag on anything while the telescope is slewing.
- Always give the camera time to warm up and cool down. Don't pull the plug while the cooling system is still running.
- If you're changing something in the Setup dialog box in the middle of the run, make sure to re-define the operating temperature so that it doesn't drift.
- Remember to clean up any image files you made, as a courtesy to the next observer. We reserve the right to delete old images if we deem them a nuisance to other observers.
- Any of the following will change the vignetting pattern and require new flatfields: changing focal reducers, rotating the CCD, or changing filters.
- Take care not to leave the CCD or its power supply outside if it can get rained on.
Before the Run
Planning
- You can operate the CCD in two configurations: attached directly to the C-14's flip mirror, or with the f/6.3 focal reducer. The best choice depends on your observing goals. The specs for the C-14 in each mode are as follows:
Use of the f/3.3 focal reducer is not recommended at this time, as it introduces coma.Configuration Pixel Scale Field of View Vignetting No Reducer 1.06″ 8.97′ 8% f/6.3 Focal Reducer 1.38″ 11.8′ 16% - Use the exposure calculator to find out how many exposures of what length you will need. The calculator hasn't been calibrated yet, but it will still give you a rough sense of whether you need 10 seconds or 10 minutes. In exposures longer than 5 minutes the sky will begin to saturate the detector.
- If you are planning exposures longer than 30 seconds to 1 minute, you will need some form of guiding. Check Starry Night Pro to see if there is a suitable guide star nearby. You should use an 8th magnitude star or brighter if you are imaging through broad-band color filters, or 10th or brighter if you are only using the clear filter. On a good night, you can sometimes go a magnitude fainter than these limits. You may need to rotate the camera to get a star in the guider's field of view; if so, take note of the position angle (E of N) you need. You will only be able to get flats for one position angle per night.
Probabilities for getting a guide star for a random field center are shown below. If you can't find a guide star, your best option at the moment is to take a series of short (15-30 second) exposures using the Auto-Grab mode and stack them later. We are working to enable other options.Configuration Star falls on guide chip Star can be rotated onto guide chip <8th mag <10th mag <8th mag <10th mag No Reducer 0.08% 0.6% 1.7% 11.9% f/6.3 Focal Reducer 0.1% 1.0% 2.8% 18.7% - If you need to rotate the camera or switch focal reducers, you will need to remount the camera in the daytime. You must take all flatfields after you've changed the camera configuration.
- Taking flat fields is highly recommended because the C-14 suffers from vignetting. Plan to arrive at least 30 minutes before sunset to set up the telescope in time to take twilight flats. We don't support dome flats at present. For photometry or other more demanding applications, plan to arrive at least an hour before sunset so the CCD chip and electronics have time to stabilize to a fixed temperature.
Filter Changes
Mounting the CCD
- If the CCD is already mounted on the telescope and you need to rotate or remount it, do so indoors, in a well-lit room, well before your observing run. Have a hex wrench and any reducers in easy reach, to avoid having to fumble for them. The CCD is a delicate piece of equipment, so handle it with care.
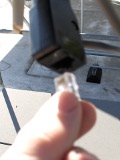
- Hold the camera firmly in one hand and use a 7/64 hex wrench to loosen the three screws attaching the camera assembly to the flip mirror. Once the screws are loosened, gently lift the camera off the flip mirror and place it on the table.
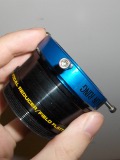
- To attach a focal reducer, remove it from the eyepiece box, screw the blue adapter ring onto the reducer, and then screw the reducer onto the camera end. Make sure all the pieces are firmly attached, but don't over-tighten.
- To remove the focal reducer, unscrew the focal reducer from the unmounted camera and unscrew the blue adapter ring from the reducer. The reducer goes in the cardboard eyepiece box. Screw the blue ring directly onto the CCD and make sure it's firmly attached.
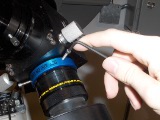
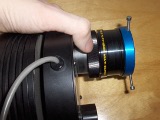
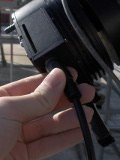
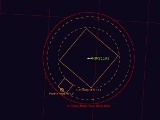
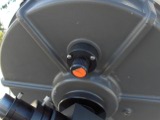
- To attach the CCD-reducer assembly to the telescope, hold it against the flip mirror with one hand and tighten the screws on the blue ring with a hex wrench. Do not let go of the CCD until all three screws are securely tightened. To mount the CCD at a specific position angle, see the image below.

Press camera firmly against flip mirror
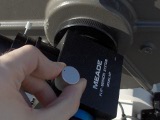
Reattach camera
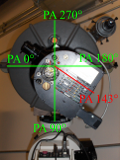
Position angle reference
Hold camera firmly before removing
Loosen screws to remove camera
Unscrew previous reducer from camera
Adapter ring comes off
Set-Up
First, set up the C-14 and computer as usual.
Cables
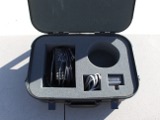
- Take the black case marked "SBIG ST-9E" from its shelf in the storeroom and remove the power supply.
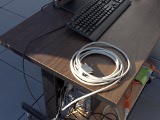
- Place the power supply on the ground next to the telescope, as close to the telescope pier as possible to ensure the cable will be long enough no matter where the telescope slews.
- Plug the round cord into the socket on the end of the CCD and the other cord into the power strip on the computer cart. The red light on the back of the CCD should turn on, and you should hear the fan running.
- Plug the large gray cable into the matching port on the end of the CCD. The other end should already be plugged into the computer.
- If you will be using autoguiding, remove the phone cable from the case where you found the power supply. Plug one end into the adapter attached to the CCD, and the other end into the port marked "Autoguider" on the mount.

Power supply must be near pier
Power cable

Data cable
Guider cable
Starting the Camera
- Start up CCDOps by clicking on the desktop icon.
- Select Setup from the main toolbar or from the Camera menu.
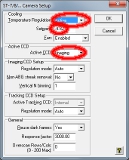
- In the dialog box that appears, set Temperature Regulation to Active. For Setpoint, pick a temperature 25-30 degrees below the ambient temperature. The ambient temperature is displayed in the lower right corner of the CCDOps window.
- Make sure the Active CCD is set to Imaging, and the Resolution for both chips is set to Auto. Then click OK.
- Give the CCD 10-20 minutes to stabilize at the operating temperature. This would be an excellent time to start up and calibrate the C-14.
- Select Misc->Telescope Setup from the menu and enter your name for "Observer". Don't change the telescope specs.
- If you are using Starry Night Pro (highly recommended), open the FOV tab on the left side of the screen and make sure the row for the ST-9E is checked. Right-click on the ST-9E and make sure the correct focal reducer is set. Zoom in on the main display until you can clearly see the CCD field of view, and check that the position angle matches the actual CCD orientation (see image above). If not, click and drag the field of view to give it the right orientation. This will save you a lot of trouble when trying to frame images or acquire guide stars.
- Check the temperature on the lower right side of the CCDOps window. It should be within a degree of the temperature you set, and the cooling system should be running at roughly 75% capacity. If it's running higher, warm up the CCD by a few degrees by going back to the Setup dialog box.
Turn on cooling
FOV tab
Camera overlay
Temperature indicator
Focusing
- Center a 7-8th magnitude star in the eyepiece. Stars in the western sky are preferred, because then you will be able to reach the focus knob and see the computer monitor at the same time.
- Get approximate CCD focus by turning the focus knob roughly three and a half full turns counterclockwise (assuming you're using the 40 mm eyepiece and it is in focus).
- Turn the flip mirror to let light pass to the camera.
Focus knob
Flip mirror
- Select Focus from the Camera menu or the toolbar in CCDOps. In the dialog box that appears, pick an exposure time of 0.5 seconds, and set the frame size to Planet.
- CCDOps will take one full-frame exposure, then wait for you to identify the focusing star. Drag the white rectangle so that it's centered on the star. The star will probably look like a large ring at this stage; that's fine. Click Resume to start taking rapid exposures of the region around the star.
- Turn the focus knob until the ring collapses into a reasonably starlike image. You may need to turn the screen so you can read it from the telescope.
- If you want, you may keep the same star for fine focusing, or close the focus dialog box and switch to a fainter star (9th magnitude or so) and a longer exposure time (2-3 seconds). Longer exposures require more patience at the focus knob, but they should – in theory, at least – be less affected by seeing variations.
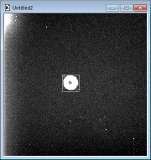
Select a star
In focus
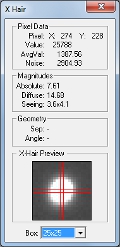
- After every exposure, the focus dialog box will display the count value of the brightest pixel in the image. This number will fluctuate because of seeing and transparency variations. Wait for ~10 exposures to get a good feel for the range of values.
- Turn the telescope focus knob a small amount, then wait for ~10 exposures to see if the overall range has gone up or down. Repeat as neccessary. As you approach best focus, the fluctuations in the brightest pixel will grow until it's varying by a factor of two.
- The C-14 focuser has some hysteresis, so reversing the direction you're turning the focus knob will at first have no effect other than to shift the stellar image without changing the focus quality. If you've overshot best focus it may help to turn the knob a little farther "the wrong way" (an eighth-turn should be enough) before changing directions, so that as you approach best focus again you only need to turn the knob in one direction.
- Once you're satisfied with the camera focus, close the dialog box to exit Focus mode.
Guider Calibration
If you are using autoguiding, you need to tell CCDOps how to convert between chip and sky coordinates. The calibration only needs to be done once per observing run unless you rotate the camera or change the guide speed on the keypad (though the default value of 0.5× is highly recommended).
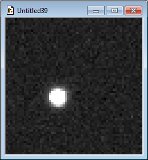
- Center a 7-10th magnitude star on the imaging chip. The star must be the brightest star within one field of view in any direction. A star at the same declination as your target(s) works best.
- Experiment with exposure times until you get roughly 30,000 counts on the brightest pixel.
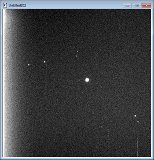
- Select Track->Calibrate from the menu. In the dialog box that appears, enter the appropriate exposure time and the declination of the star. Make sure the X Time and Y Time values are 30 seconds (if you're guiding at 0.5×; use shorter values for faster guiding), and that you're using the Imaging CCD.
- CCDOps will take a sequence of five exposures over the next two minutes. The final result should look like the image below (with some rotation). If the axes aren't at right angles, check if another bright star might have drifted into the field during one of the slews.
Pick an isolated bright star
Check your counts
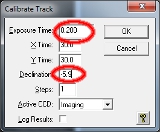
Set exptime and declination
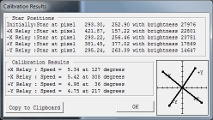
Correctly calibrated (for PA 143°)
- Guiding will now work correctly.
- You can use the numbers in the calibration dialog box to fine tune the FOV orientation in Starry Night Pro to within one degree, but beware that the angles in CCDOps are rotated and flipped from those in Starry Night.
Using the CCD
Taking Exposures
These instructions apply if you are taking short exposures of 30 seconds or less. For longer exposures, see the section on autoguiding.
- Slew the C-14 to the target. If you need to center on a reference star, make sure to center it in the CCD field of view, not the eyepiece. The two field centers are offset from each other by roughly half a CCD field (five arcminutes).
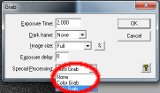
- Select Grab from the Camera menu or from the toolbar. Enter the desired exposure time (minimum 0.12 seconds). Dark Frame should be set to "Only" for dark and bias frames, and "None" otherwise.
- CCDOps will take the image and display it when it's done. If you're happy with the result, save it to disk.
Multiple Exposures
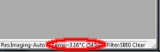
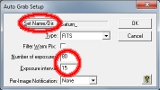
- If you want to take a series of exposures for stacking, select Grab, then set Special Processing to "Auto-Grab".
- The next window will let you pick the filename (in the format base001.fits), the number of exposures, and the time between exposures in seconds. Any value less than the exposure time plus readout time (10 seconds for the default 1×1 binning) means the new exposure will start as soon as the old one is downloaded.
Auto-grab option
Set cadence
- CCDOps will automatically display and save each new image as it comes in.
Binning
- The CCD supports 2×2 and 3×3 binning. Select Setup from the main toolbar or from the Camera menu. Set Resolution to Auto for 1×1 binning, Medium for 2×2 binning, and Low for 3×3 binning. The remaining settings are intended for spectroscopy; ignore them.
- The operating temperature in the Setup window won't be the exact value you set it to. You must re-enter the old temperature every time you use the Setup window, or it will drift and your dark frames won't properly remove hot pixels anymore.
Changing Filters
- To change filters, open the Filter menu and choose the desired filter. The filter change will take a second or two. The filter name will be included in the FITS header of any images you save.
- The Clear, Red, Green, and Blue filters are all parfocal, so you can change between them at will. Changing to and from the I-band filter requires refocusing the camera.
- The color filters require 2-3 times longer exposures to get the same signal to noise as the clear filter.
Autoguiding
The C-14 does not track perfectly, and over long exposures the image will tend to drift. Autoguiding, where possible, is the best way to correct for the drift.
- Check Starry Night for a suitable guide star near the location of the guide chip. If you're imaging through the clear filter, the star needs to be brighter than 10-11th magnitude depending on conditions. Through colored filters 8-9th magnitude stars are the faintest on which CCDOps can guide.
- Choose Switch CCDs from the Camera menu or the toolbar to switch to the tracking CCD. Take a short exposure to make sure the guide star is on the tracking chip.
- Select Self Guide from the Track menu or the toolbar.
- In the following dialog box, state the length of the main exposure (series of exposures while guiding aren't supported), the length of the guide exposure (up to 5-10 seconds before the corrections become too coarse), and the declination of the guide star. Make sure Guide To is set to Centroid.
- CCDOps will take one exposure and ask you to select the guide star. Drag the white box so that it frames the star and click "Resume". CCDOps will begin taking rapid exposures with the tracking chip.
- It may take 20-30 exposures for the tracking to stabilize. After about 10 exposures CCDOps will report some quality statistics; you want the RMS error in both X and Y to be less than half a pixel. If it frequently gets above 1 pixel, try lowering the aggressiveness setting below the default of 10 (in effect smoothing over multiple tracking exposures). If the guide star shows a systematic drift, try raising the aggressiveness setting.
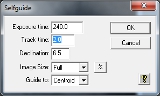
Set exposure times
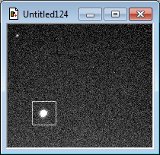
Select guide star
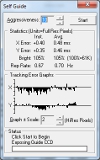
Status window
- Once the camera is tracking reliably, click "Start" to begin the main exposure.
- Once the main exposure is done, the camera will stop guiding.
Shutting Down
- Change back to the clear filter if you were using different filters. This will make setup easier for the next observer.
- Select Shutdown from the Camera menu or the toolbar. When prompted, choose "Warm Up and Wait". Wait while the cooling system steps down; do not unplug the CCD until it finishes!
- Once the CCD is shut down, you can close CCDOps.
- Unplug the CCD. Leave the gray cable wound up on the cart, and put the power supply and the phone cable in their case. Put the case back on its shelf.
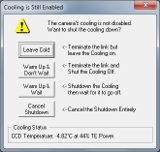
Shutdown window
Stow data cable
Stow power supply
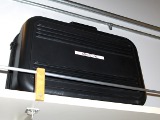
Stow case
- Shut down the C-14 as usual.
- Don't forget to transfer your images to a USB stick before you leave! We, or the next observer, reserve the right to delete old images if they're cluttering things up.